Saturday 9 May 2020

Contentful - API First Content Management System


Hello,

Due to COVID-19, I found some time during weekends to explore something new and I invested this to understand Contentful CMS platform.  Couple of days I spent on gathering knowledge-base, collected pieces of information through community forums and in the end comes up with a static web site TECH CLUB. 😇(Can take a while to load as 0$ spent on whole). 80% content of this web-app serve through Contentful.

I would like to touch every point which I think is worth sharing for CMS Developers.

Firstly, Tech Stack

Contentful does not have complex technology stack on its own and can easily adaptable by other platforms due to its headless nature.


Contentful CMS export the content as service via various endpoints which later is consume by different FE/BE frameworks. It depends on the client's requirement which framework to choose. I used JAVA / SpringBoot / Mustache, Heroku during my learning of Contentful.

SDKs plays vital role during development and have APIs which can make your task smoother 😎
Available SDKs

Secondly, Content Modelling

Content Modelling is one of the tricky and brainstorming exercise which decide the success rate of your Contentful implementations. Most of the clients face challenges here. Although this CMS looks quite simple and business assume with the help of UX or Backend resources they can smoothly deliver the solution, In my opinion, an experienced CMS Developer is must need for Contentful implementation.

A developer who has worked on CMS systems understands the concept of Components, Content Reusability etc, If you don't have that type of skill, project will end up with many Content Types. Last but not least, Content Types is a kind of Data Model which are not free and will cost company if best practices are not followed. Therefore, a good Content Modelling is the key of successful Contentful implementations which can deliver by skilled CMS Developer.

I have used 6 Content Types for my demo web app. Max. 24 can be use with free licence.  


Finally, Some differences between Adobe AEM and Contentful CMS

AEM and Contentful both have key features like Headless and As A Cloud  Service . Adobe recently introduced AEM as a cloud service to reduce the infra and maintenance cost for client business. However, Contentful adopted this feature way before and seems mature enough.


AEMContentful
Authoring experience is very simple and interactive because of coral uiAuthoring experience is not very interactive and authoring guidelines are must for content producers
Its expensive choice for organizations which are not content heavy. No free version is availableCMS free at some extent, there are some restrictions on resource usage. Multiple plans are available as well.
AEM provide more flexibility over customization with features like resource mergerContentful use a set of fields which are hard customize but has rich plugin repository to compensate.
AEM have all the features suitable for enterprise organization such as MSM, DAM, Workflow Mgt.Ideal for regional sites which are not content heavy


In a nutshell, If client requirements are not complex such as they don't want to use smart features of DAM, Workflow Management, MSM etc. Contentful is the ideal solution primarily for mid size companies to manage their content where company don't want to pay huge licensing fee, rather want to invest in good development team.


Some Notes :


  1. Contentful SDKs are centric for frontend development, hence frameworks like angular or react are more preferable for development.
  2. Some business which are using this CMS TELUS , SUNWING , SHAW , ROGERS , AIR Canada etc.
  3. Git Hub Spring Boot Project  . Best practices for coding may not meet as the idea was to get the understanding of this CMS and build something on top of that.
  4. During this journey, created first linkedin group for Contentful professionals  ðŸ’¡


Tuesday 26 November 2019

AEM Dispatcher & Apache Management Using Docker Plugin in IntelliJ IDEA


Hi Everyone,

In this blog I am going to demonstrate the usage of Docker IntelliJ IDEA plugin and how this plugin can help to manage dispatcher related tasks in one window rather navigating through terminals, typing commands , open vim editors to check the cached content etc.


Prerequisite: 

This blog is based on the fact that developer is using docker to work with apache and dispatcher. In addition, Docker Desktop is running on your machine.

Please refer the below repository to set up Dispatcher / Apache on your local machine.


https://github.com/vivekdhiman/dispatcher-docker-setup

Below are the steps to work with Docker Plugin within IntelliJ IDEA.

Step 1 

Install latest docker plugin from Marketplace, if you already have, make sure its updated one. This feature is tested on IntelliJ IDEA version 2019.2.4 (Community Edition)


Restart the IDE.

Step 2

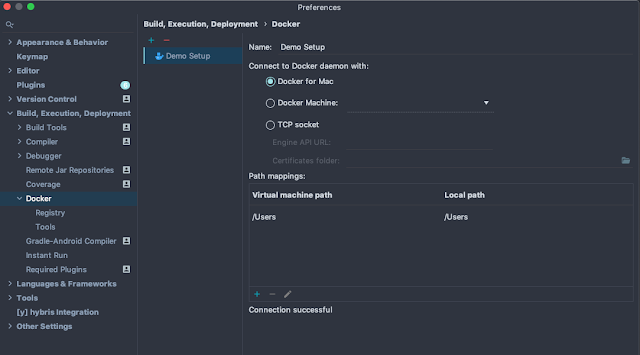
Create initial configuration as per you docker instance. In intelliJ this can be done under Build and Deployment section as below. Just Click + sign and add details.


Connection successful represents, you plugin has been established a successful connection with you local docker instance.

Step 3

Under the Services console window of IntelliJ, Docker instance will be display with several menu options as shown below. 


Click the Start option. Expand the Docker option. This will list the containers and images under your docker instance.


Step 4

Map the DockerFile to the deployment configuration of docker instance.


Add below in the configuration window. These configurations can be changeable as per project's naming conventions.

  • Docker File Path
  • Image Tag
  • Container Name
  • Bind Ports
    • Host Port : 8080
    • Container Port : 80
    • Protocol : tcp
    • Host IP : 0.0.0.0
  • Environment Variables
    • HOSTIP=XXX.XXX.X.XXX (This IP will be based on your network. Use command ipconfig getifaddr en0 to get the value in mac)
Please refer below screenshot and click on run button. Or you can use the context menu to run that.


You can also view the complete command in command viewer.

Please Note : HOSTIP should map exactly same in dispatcher.any file under /renders

Step 6 

After running the docker instance with the configuration provided above. you can view the container and docker images created. 


There are various options in the right pane which can help to analyse logs and troubleshooting. If container is in green color, it means its started and active.

Step 7

Hit the URL http://aem.dispatcher-dev:80/ , you should be able to see 404 page. This means setup is completed by using docker plugins.

Please Note : There is host entry in your machine with 
127.0.0.1 aem.dispatcher-dev

Additional Info

  • To rebuild and deploy the updated configuration, Just deploy the existing configuration that you have created from context menu under services tab. Before that, please make sure Docker instance is stopped, only then menu options will be visible.  


Advantages of using Docker Plugin 


  • User can manage the docker container such as build image, creating container, deploy configuration etc. in span of time within from IDE.
  • User can check the logs from the same page to see incoming requests.

  • Quickly access cached content and verify the content. Check markup within IDE. Just double click on the file.


  • Use shell commands within container. Navigate to running container and right click, select option Exec , select Create.. and the rm type command such as rm -rf /Library/WebServer/docroot/publish/etc.clientlibs to clean the client libraries.
    • These commands are store in cache of container so do not need to retype again.


    • To view the changes reflected on cached files, you need to refersh publish folder


Hope this will make the way easier for developer to manage docker managed apache/dispatcher containers.


Tuesday 23 October 2018

Reuse or Make Header & Footer Common in AEM6.4 - Editable Templates


One of the problem that we see after using editable templates is referring the same header and footer in multiple templates.

Prerequisite : Developer should have knowledge of Editable Templates.

In legacy template development, we use the create a basepage template where we embed the header and footer nodes. Any template that inherit base page templates render the header and footer without re-authoring.

In latest AEM versions where Editable Templates comes in picture, we encounter with two terms related with templates.

  • Template Types
  • Templates
Here every template is a separate entity and does not inherit from other template rather inherit from Template Types.

To create a relation between two components  or share the components we can use two approaches :

  •  Include the content resource in your template script file.
  •  Use the content fragment.
Below are the common steps to create basepage and homepage templates.

Step 1 : After setting up vanilla AEM project, we can see ContentPage template is already present


Step 2 : Create a new template say base-page template using empty page template type.


Step 3 : Configure the base-page template with Header and Footer as shown below.


Step 4 : Publish the template.

Step 5 : Create another template say homepage template from empty page template type as we created for base page.

Now user must see header and footer on homepage template without re authoring.


Approach 1 :

·         Inject the content resource in body.html with specific condition.

<sly data-sly-resource="${ @path='/conf/aemcorner/settings/wcm/templates/base-page/structure/jcr:content/root/header', wcmmode='disabled'}"/>

Please refer the page component from the repo


Approach 2 :

Use content fragments. (Yet to publish)


Github Repo (Full Code Access ): 

https://github.com/vivekdhiman/aemblogs.git


Thanks,


Saturday 5 September 2015

Render JSON Data Using Sightly & Custom MultiFieldPanel


Hi Guys,

I got the task to render the JSON Data which store in JCR via MultiFieldPanel (a custom xtype). Just sharing the solution with you. I usually get the values from the hierarchical nodes & then create the Map and render over the JSP using Custom Tags. Here I am going to demonstrate If your data is store in form of JSON format and nested in form of multiple entries, then how you can fetch and render that data using Sightly.

Below is the snapshot of dialog and how the data is getting store in JCR.


And Below is how the content store in JCR, Here it create the array of multiple JSON entries :


Here we can choose 2 ways to render the data over the html. First one is Java-Use api Second is Javascipt-Use api. Here I am demonstrating using Javascript API

1) Javascript-Use API :

Sightly use the server side Javascript in order to execute the logic in form of USE classes.
Below is the HTML code that render the markup over to browser.

<sly data-sly-test="${wcmmode.edit}">Country Information</sly>
<sly data-sly-use.countryInfo="${'practice/components/clientlibs/convertToJson.js' @ fieldName = 'countryinfo',fieldValue = ''}">
    <ul>
        <sly data-sly-list.countryDetails="${countryInfo.listJson}">
            <li> ${countryDetails.country}
                <ul>
                    <sly data-sly-use.stateInfo="${'/apps/sdsingtel/components/clientlibs/convertToJson.js' @ fieldName = '',fieldValue = countryDetails.states}">
                        <sly data-sly-list.innerlistJson="${stateInfo.listJson}">
                            <li> ${innerlistJson.state} </li>
                            <sly data-sly-use.cityInfo="${'/apps/sdsingtel/components/clientlibs/convertToJson.js' @ fieldName = '',fieldValue = innerlistJson.cities}">
                                <ul>
                                    <sly data-sly-list.citylistJson="${cityInfo.listJson}">
                                        <li>${citylistJson.city}</li>
                                    </sly>
                                </ul>
                            </sly>
                        </sly>
                </ul>
            </li>
            </sly>
    </ul>
    </sly>

Here we are invoking convertToJson file ans passing two parameter : fieldName and fieldValue. 

Here fieldName stands for name of the widget which I assume is the root from where out custom multi-field starts.

Here fieldValue stands for of the nested widget which is the root of next level from where out custom multi-field starts.

As the JSON we are rendering is nested so for one level i passed fieldName but after that its fieldValue.

Below is the JS code which takes the resource and return its corresponding JSON.


"use strict";

use(function () {
    var readJson = null;
    var listArr = [];
    if (this.fieldValue != '') {
        readJson = this.fieldValue;
        var count = 0;
        if (readJson != null && readJson != "") {
            readJson.forEach(function (entry) {
                var itemJson = JSON.parse(entry);
                listArr[count++] = itemJson;
            });
        }
    } else if (this.fieldName != '') {
        readJson = granite.resource.properties[this.fieldName];
        if (typeof readJson != "undefined" && readJson != null && readJson != "") {
            if (readJson.length > 0) {
                var count = 0;
                readJson.forEach(function (entry) {
                    var itemJson = JSON.parse(entry);
                    //    out.println(JSON.stringify(itemJson))
                    listArr[count++] = itemJson;
                });
            } else {
                listArr[0] = JSON.parse(readJson);
            }
        }
    }
    return {
        listJson: listArr
    }
});

Here is the snapshot how data is rendering via this approach.


Hope this will help.